Change Price
Permanent Retail Price Reduction
Section 1: Query Page
Purpose: Search for existing price-change documents.
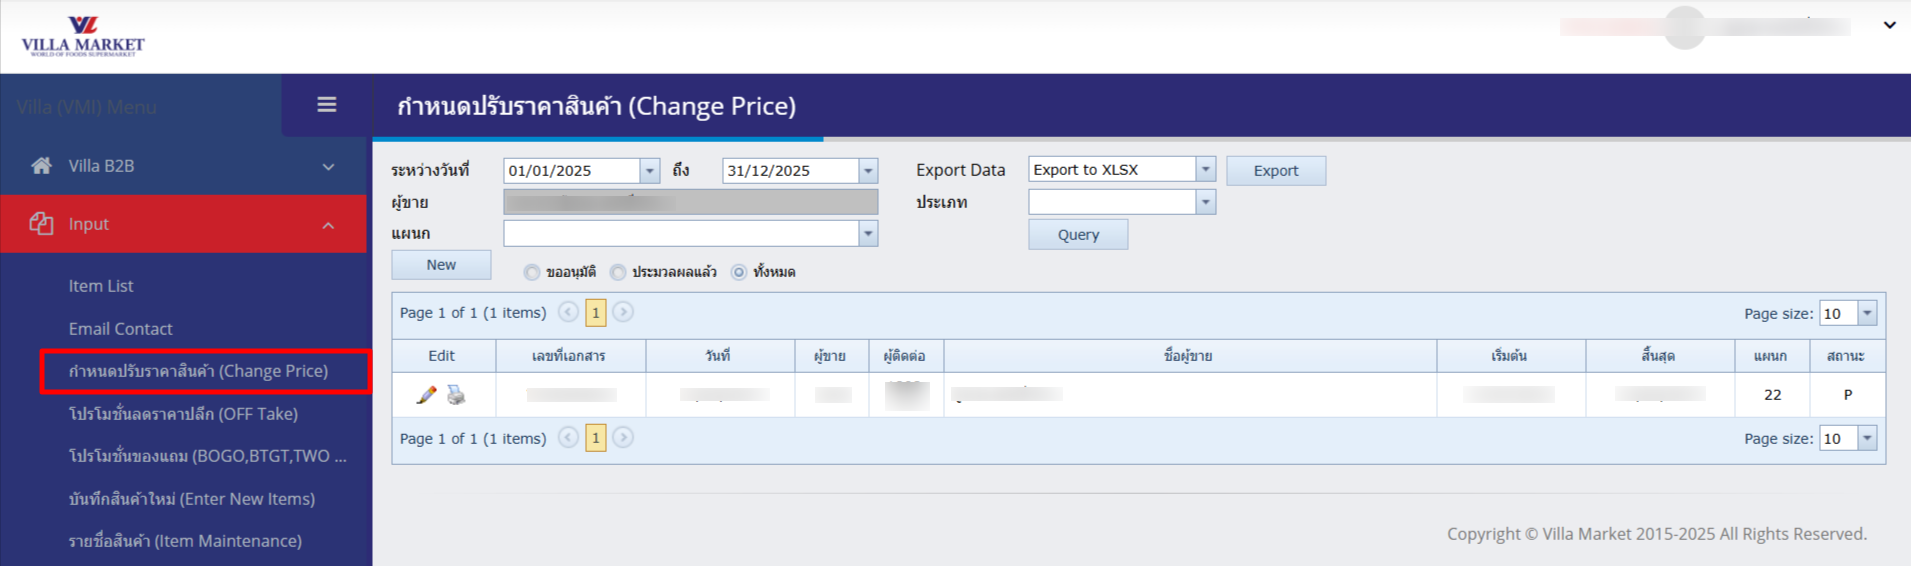
How to Search
Select Start Date and End Date to define the document period.
Click the Query button to display all documents within that period.
Filter by document status:
Approval Requested
Approved / Published
All
Section 2: Create a New Change Price Document
Click the New button to start a new price-change request. You will enter the “Add Change Price” screen.
Required Information when Creating (New)
Type
MKU = Mark Up (price increase) MKD = Mark Down (price decrease)
Category of Price Change
• Retail Price only • Cost Price only • Both Retail & Cost
Contact & Department
Must select the responsible contact and department
Linked Items
The items to be adjusted must belong to the same group/department. If not, create a separate document.
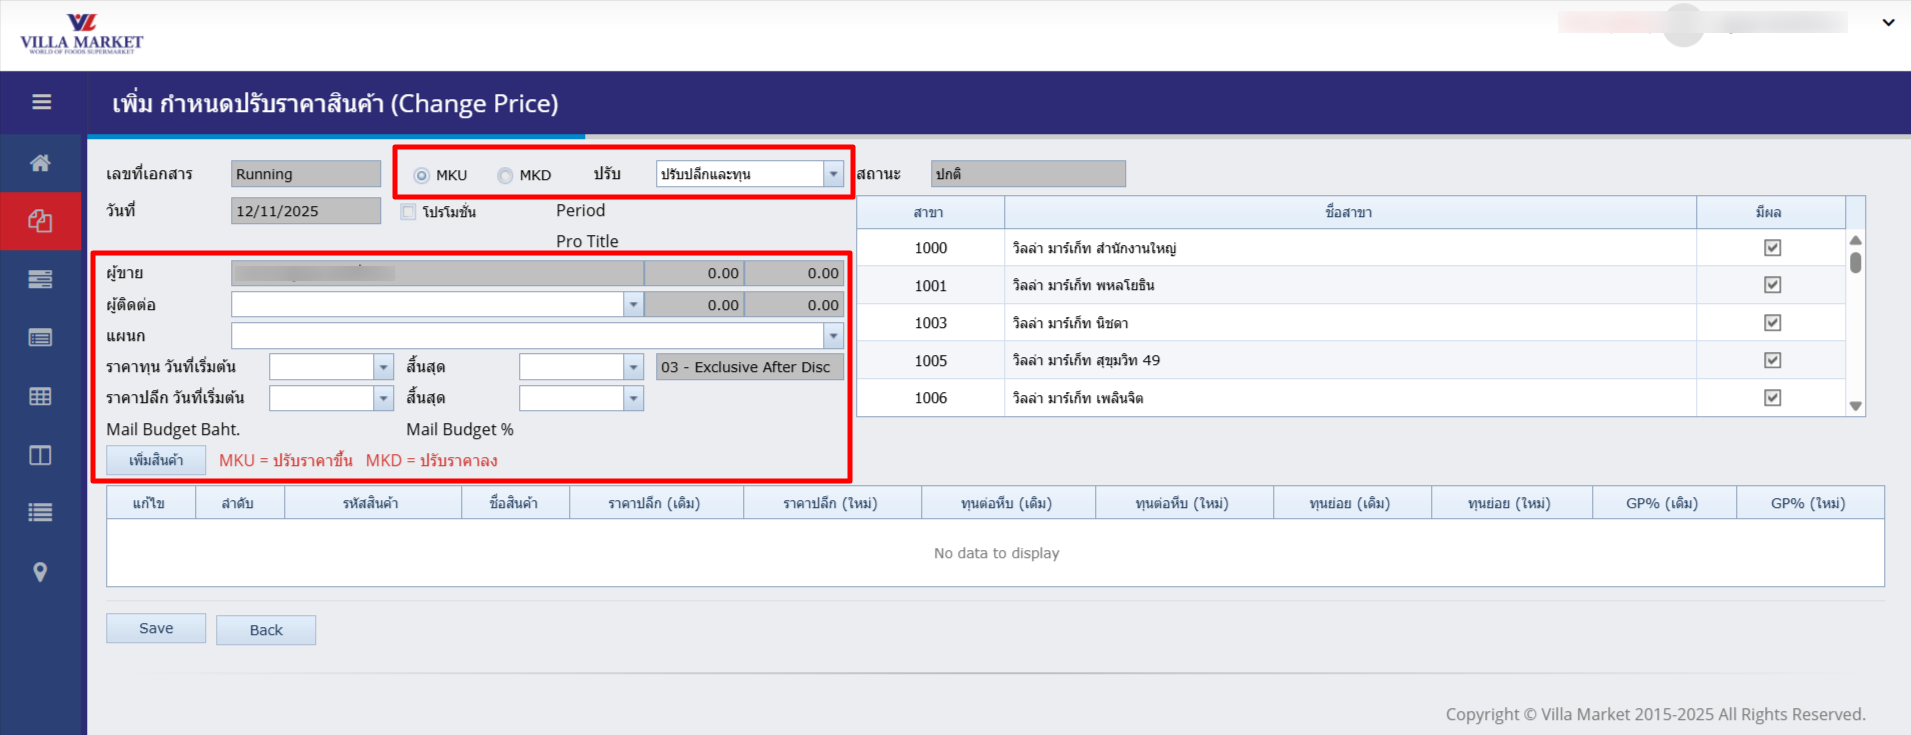
Document Details
Document No.
Automatically generated running number by the system.
Date
The date the document was created.
Type
Two possible values: • MKU = Mark Up (price increase) • MKD = Mark Down (price decrease)
Adjustment Type
• Adjust retail price only • Adjust cost price only • Adjust both retail and cost prices
Supplier
Select the supplier that is associated with the products being adjusted.
Contact
Name of the main contact person at the supplier for this document.
Department
Specify the responsible department (e.g., Grocery, Beverage, Fresh Food)
Cost / Retail
Specify the effective date range for the price change (cost or retail price).
Mail Budget Baht / %
Used to record any discount budget or promotional value (if applicable).
Add Product
Button to choose the product(s) that require the price adjustment.
💡 Notes
If you are changing cost price, you may increase or decrease it based on agreed terms with the supplier.
Ensure all items selected are linked to the correct supplier, department, and product group.
Use the “Add Product” button to include items and to capture the old price vs new price details.
Section 5: Store Selection
On the right side of the screen you will see a list of stores (e.g., 1000 – Head Office, 1001 – Phaholyothin, 1003 – Nichada, etc.). Tick the checkbox for each store where the new price will take effect.
Add Items to the Document
When creating the document, click the “Add Item” button. A new window will open for you to specify the old price and the new price for each item.
After “OK” (Add Item)
Once you have completed the item entry and click OK, the system will:
✅ Add the item into the change-price document, displayed in the table below with old price and new price.
🧮 Calculate and display the old price, new price, and GP% (Gross Profit %) automatically:
If cost price ↑ → GP% ↓
If cost price ↓ → GP% ↑
If both cost & retail price are changed → system shows the new profit margin accordingly.
💾 Save the item entry under the main document. You may edit each line later by clicking the “Edit” button in the table.
📊 Impact on other systems: The new price will apply to cost calculations, retail pricing at the POS, purchasing and inventory systems. The effective date is controlled via the “Start Date” field for cost or retail price.
⚠️ Important Notes
Ensure the entered price matches the Target Unit (selling unit) to prevent cost/price discrepancy.
If the items to be adjusted belong to different groups/departments, create separate documents for each.
Before clicking Save, verify all cost price and retail price fields on each line are correct.
✅ Summary
Pressing “Add Item” in the “Change Price” screen lets you add individual items and immediately view the old vs. new prices, including gross profit change. This helps department managers verify pricing accuracy across the system before final approval.
Last updated